Help Center
Everything you need to know about MyWeeklyMenu — the planner grid, meal picker, week and day templates, custom meals, nutrition dashboard, shopping list, profile settings, and sharing.
Getting Started
MyWeeklyMenu is a free weekly meal planner with 200+healthy recipes, automatic nutrition tracking, and a shopping list that scales to your household. Here’s how to get up and running in a few minutes.
📋 Create your account
⚡ Quick start: your first week
Your plan saves automatically every time you make a change — no save button needed.
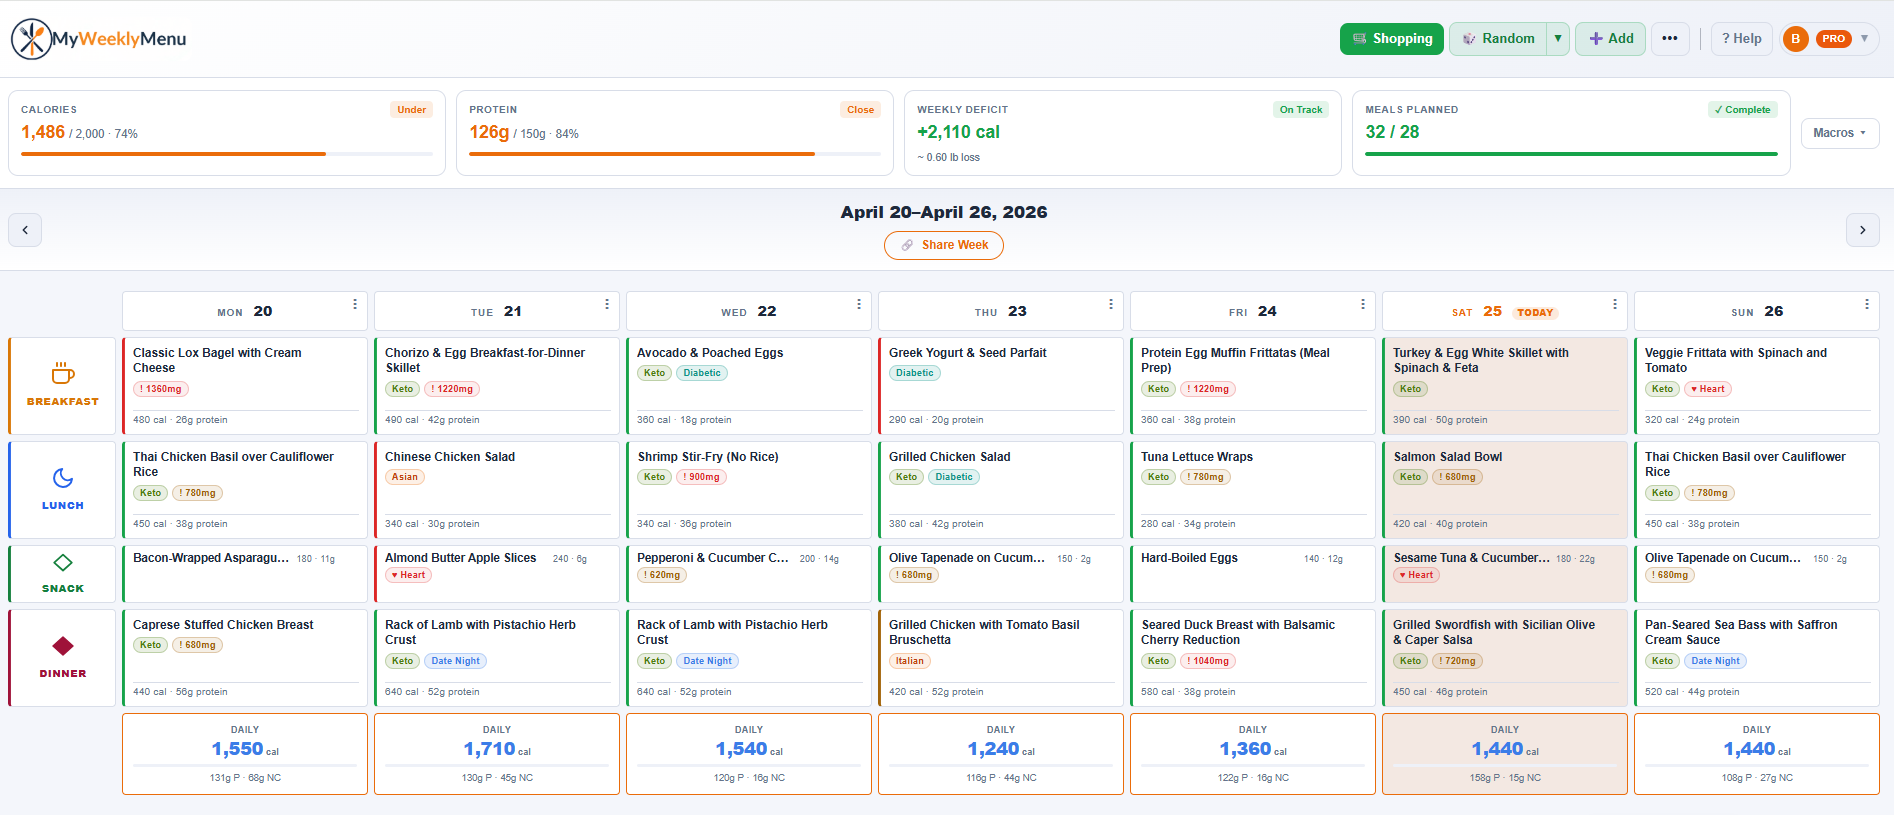
The Planner
The planner is a 7-day grid organized by meal type. Each column is a day of the week, each row is a meal slot — breakfast, lunch, snack, and dinner.
📅 Navigating weeks
Use the chevron arrows on either side of the week title to move forward or backward through weeks. Each week is stored independently, so you can plan ahead or look back at previous weeks. Click Today (the small pill below the week title) to jump back to the current week at any time.
➕ Adding a meal
Click any empty slot to open the meal picker. Tap any meal card to preview the recipe, then hit the orange ✨ Add to [Day] [Meal] button in the footer to place the meal. A toast confirms the placement and the picker closes automatically. The slot shows the meal name, calorie count, and protein at a glance.
Previewing before adding means you can scan ingredients, cook time, and diet tags without committing. Close the recipe modal without clicking Add if you change your mind — nothing is added to your planner.
Click a slot that already has a meal in it to open the recipe directly — same modal, but no Add button since the meal’s already there.
🗑 Removing a meal
Click the meal card to open its recipe, then hit the Remove from planner button. The slot goes back to empty.
📱 Meal card indicators
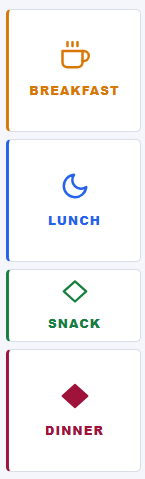
Each filled meal card shows key info at a glance. A colored left border tells you the meal type (amber = breakfast, blue = lunch, green = snack, burgundy = dinner). Small icons show diet tags and health badges. The calorie and protein count sits at the bottom of the card.
⚠ Duplicate and repeat warnings
If you add the same meal twice in the same week, the card shows a dupe warning with an orange border. If the same protein appears in back-to-back dinners, a repeat badge appears. Both are just informational — you can ignore them if you like.
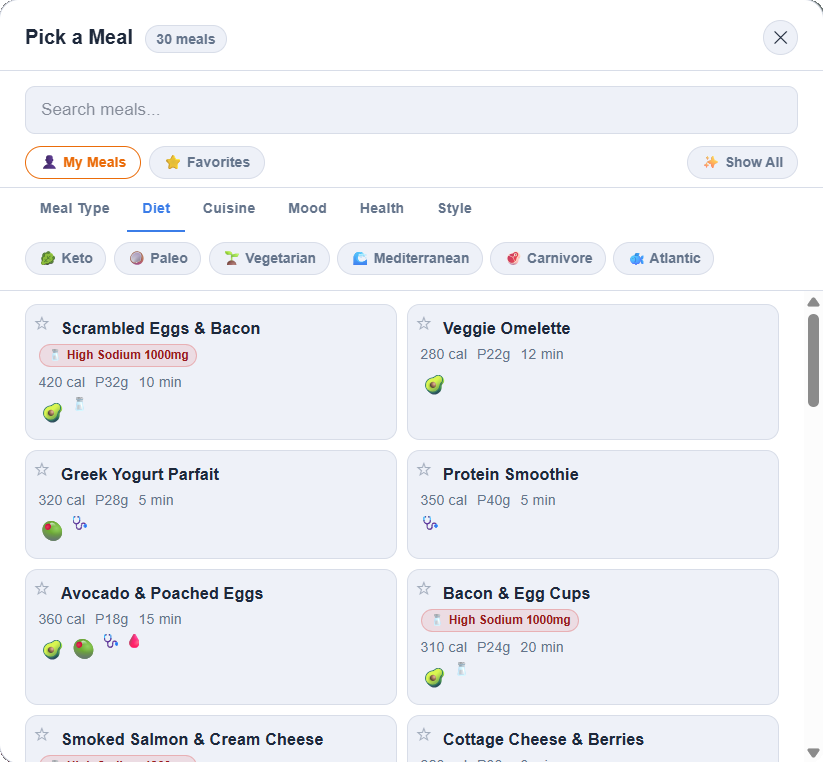
Meal Picker & Filters
The meal picker gives you access to the full library (currently 200+recipes) plus any custom meals you’ve added. Search by name or use the three filter rows to narrow by scope, category, or specific chip.
🔍 Searching
Type any part of a meal name in the search bar at the top of the picker. Results update as you type. Clear the search to go back to the full list.
🎯 Filter rows
The picker stacks three filter rows. Row 1 (pinned scope): 👤 My Meals (your custom recipes), ⭐ Favorites (starred meals), and ✨ Show All(clears any active filter). Row 2 is a strip of underline-style category tabs: Meal Type · Diet · Cuisine · Mood · Health · Style. Pick one to change which chips appear below. Row 3 shows the chips for the currently active category.
Only one filter is active at a time — picking a new chip replaces the previous one. Stacking filters (for example Keto + Quick + Under 30 min) is on the roadmap. A small count badge next to the picker title shows how many meals match your current filter in real time.
If you’ve created any custom meals, the 👤 My Mealschip in Row 1 shows a live count badge (e.g. “5”). Tap it to filter down to just the recipes you’ve added yourself.
📋 Meal cards in the picker
Each card shows the meal name, calorie count, protein, and a tag for its type. Click a card to add it to the selected slot — the picker closes automatically and the meal appears in the planner. Custom meals you’ve created carry a small CUSTOM pill on the card so you can spot them at a glance.
Tap the meal name (not the card background) to see the full recipe — ingredients, instructions, and full nutrition breakdown — before you commit to adding it.
![Recipe modal preview with the orange Add to [Day] button in the footer for one-click planning](/docs/help/recipe-modal-add.png)
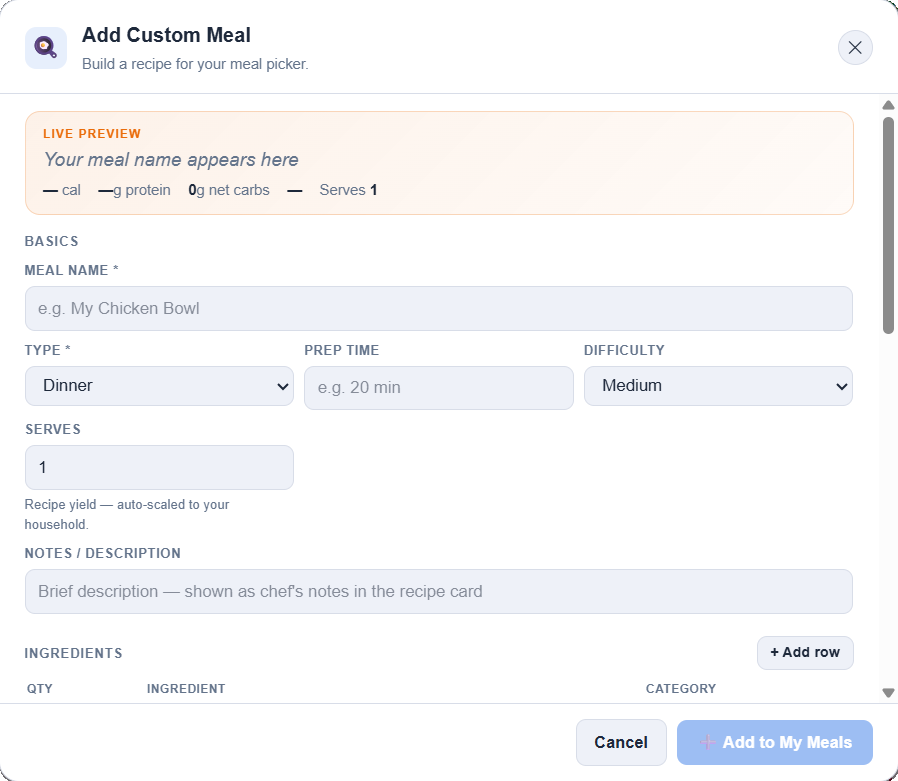
➕ Adding a custom meal
Click Add Meal in the header to open the custom meal editor. The editor has four parts that each do a lot of heavy lifting:
Ingredient list — a row-based editor where each row holds a quantity, unit, and ingredient name. Add and reorder rows as you go.
Diet picker — chip-style selector grouped into Diets, Cuisines, and Moods. Tap any chip to tag the meal so it shows up under that filter later.
USDA nutrition calculator— if you don’t have macros for your recipe, click Calculate from ingredients and the editor estimates calories, protein, fat, carbs, fiber, and sodium using the USDA food database.
Live preview card — a mini meal card updates as you type, showing exactly how the recipe will look in the picker, including a net-carb keto indicator so you can tell at a glance whether your meal comes in under 10g net carbs.
Hit Save and your meal appears in the picker alongside all the built-in recipes. Creating and browsing custom meals is a Pro feature.
Each custom meal card has a kebab menu (the ⋯ icon in the top-right) with Edit and Delete actions. Editing re-opens the same editor with your recipe pre-filled; deleting removes the meal from your library and from any planned slots.
Random & Templates
Random fills your week instantly. Templates save your best weeks — or even just a single great day — so you can reload them any time.
🎲 Random Week
Click Random in the header to fill your entire week in one shot. Meals are selected based on your profile preferences — diet type, foods to avoid, allergies, and cook time preference are all taken into account.
Pro users get Smart Random, which layers your Goals on top of the profile filters — so the engine tries to land a whole week that fits your calorie and protein targets, not just your food rules.
Click the small dropdown arrow (▼) next to the Random button to randomize just a single day. Pick the day from the menu that appears.
📅 Week templates
Week templates save the whole 7-day grid so you can reload it later. Click Templates in the header to open the templates panel.
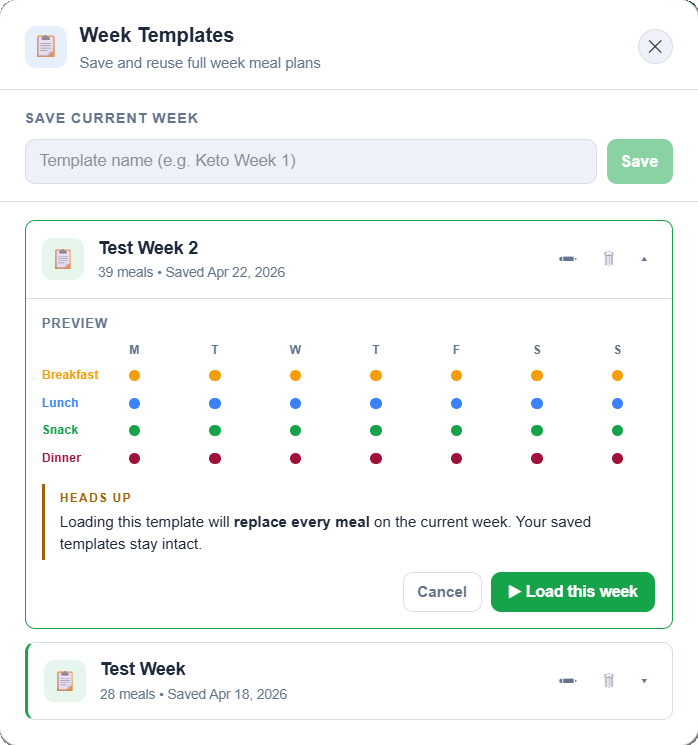
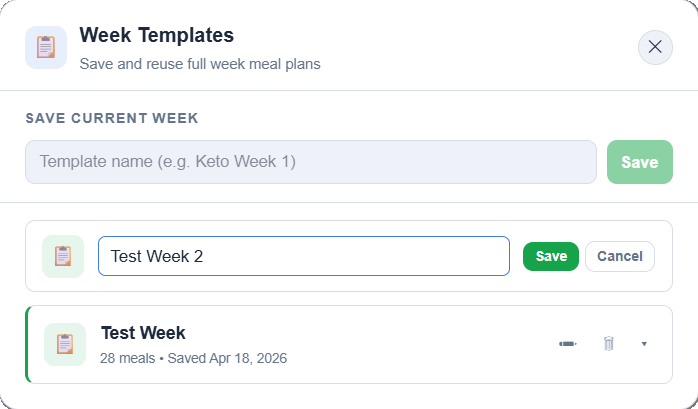
Free users can save 1 week template. Pro unlocks unlimited saved weeks.
Rotate between 2–3 favourite week templates to keep variety without planning from scratch each week.
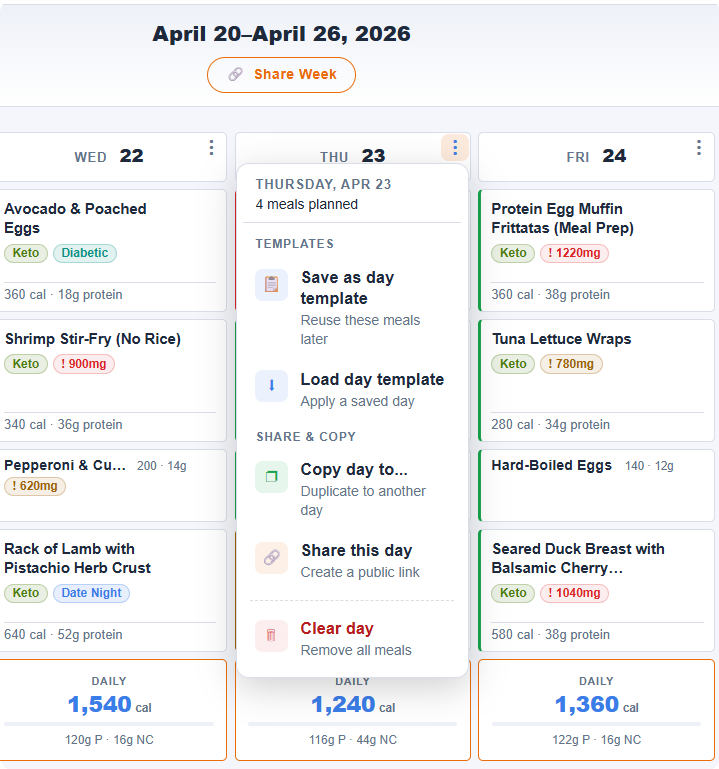
🗓 Day templates & the kebab menu
Sometimes you don’t want to save a whole week — you just nailed a single day and want to reuse it. That’s what day templates are for.
Each day header in the planner has a kebab menu (the ⋯ icon in the top-right of the day column). Tap it to open three actions:
Save as day template— stores that day’s meals (breakfast, lunch, snack, dinner) under a name you choose.
Load day template — drops a saved day into the current day column, replacing whatever was there.
Clear day— empties every meal slot for that day. Tap once to arm, tap again to confirm — a small safety pattern so you don’t wipe a day by accident.
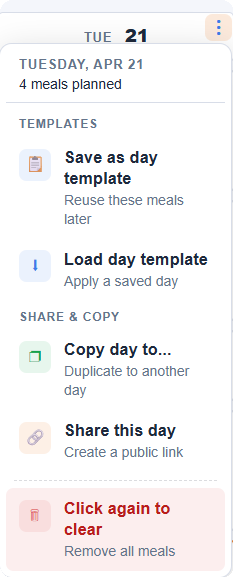
Day templates are a Pro feature. Free users can still clear a day from the kebab menu.
Save one or two bulletproof days — a go-to high-protein training day, a date-night Saturday — and drop them in any week in two taps.
📋 Copy a day to another day
Built a great Tuesday and want the same meals on Friday? Open the day’s kebab menu (the ⋯ icon in the top-right of the day column), pick Copy day to…, then tap the day you want to copy to.
Only the populated slots get copied — so if Tuesday has breakfast and dinner but no lunch or snack, only those two land in the target day. Empty slots stay empty.
If the target day already has meals, the picker shows Click again to overwrite as a quick safety check. One tap to confirm, and the existing meals are replaced. Copy Day is free for all users.
Pair this with Day templates: save a bulletproof day once, then use Copy Day to spread a different solid day across multiple weekdays without having to save it as a template first.
Tracking & Goals
Every meal has pre-loaded nutrition data. The stats bar, Goals panel, and the Weekly Nutrition Summary all update automatically as you plan — so you always know where your week stands.
📊 The stats bar
The stats bar sits just above the planner grid and shows your weekly totals and daily averages for calories, protein, good fats, bad fats, net carbs, fiber, and sodium. The calorie and protein cards are slightly larger since they’re the primary tracking metrics. Click the calorie card to quickly update your daily calorie target.
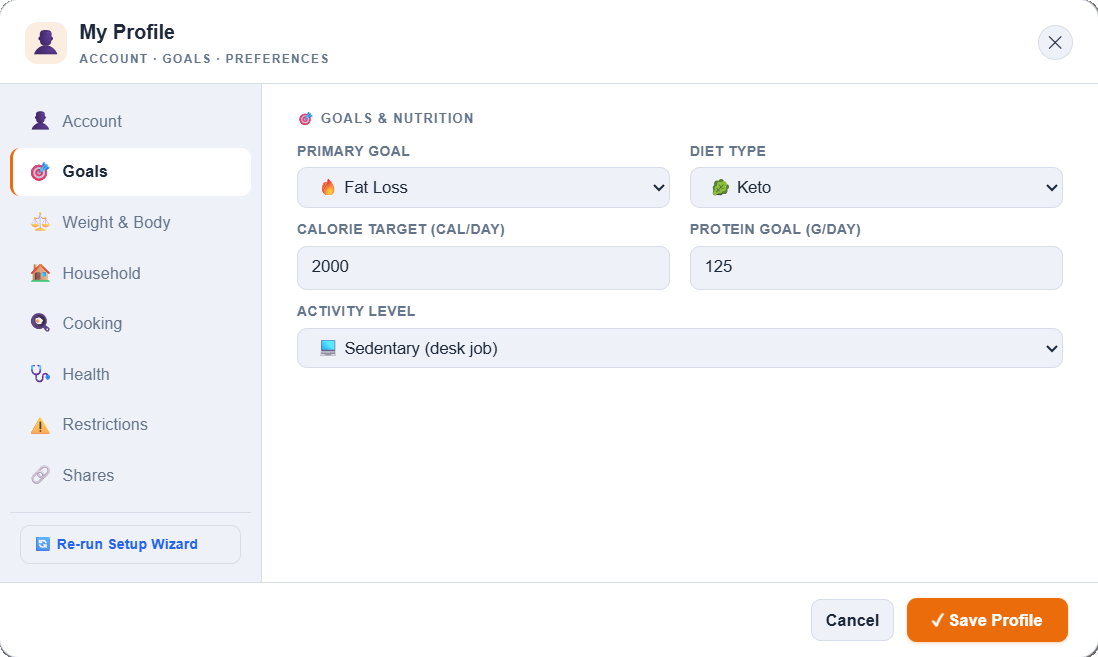
🎯 Setting calorie and protein targets (Goals v2)
Open your avatar menu (top right) and click Profile → Goals. Enter your daily calorie target, protein target, primary goal, and diet type - or let the engine derive your calorie and protein targets from your weight goal, activity level, and body metrics on the other Profile tabs.
Once your goals are saved, the stats bar above the planner grid compares your weekly averages against those targets in real time - calories, protein, and the weekly deficit each show whether you’re on track, close to target, or under. Orange text in the stats bar means you’re over budget for the week.
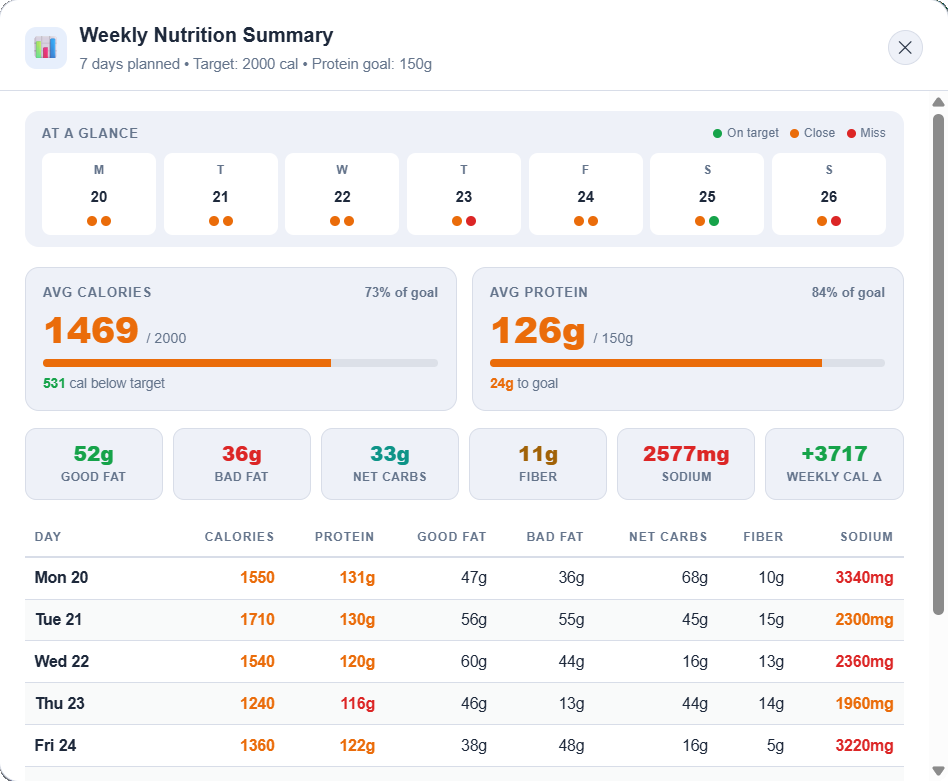
📈 Weekly Nutrition Summary (dashboard v2)
Click Summaryin the header to open the nutrition dashboard for your planned week. It’s built as a top-down scan:
7-day at-a-glance strip — stacked dots (green / amber / red / empty) for calories and protein status each day, so you can spot heavy or light days in one look.
Hero cards — two big cards show your weekly calorie average and protein average against goal, each with a progress bar.
6-metric grid — good fats, bad fats, net carbs, fiber, sodium, and a weekly calorie delta (how far over or under goal you landed across the week).
Pro users also see a full day-by-day table at the bottom (every metric, every day) and can print the whole summary as a single page — handy for clipping to the fridge or handing to a coach.
🩺 Viewing a meal’s full nutrition
Click any meal card in the planner to open the recipe viewer. This shows the complete nutrition breakdown, ingredient list (already scaled to your household size), and step-by-step preparation instructions for that recipe.
Health Badges & Diet Icons
Small icons on each meal card give you a quick read on a meal’s nutritional profile and diet category — without needing to open the full detail view.
✅ Health badges
These always show on eligible meals regardless of your profile settings — they reflect the meal’s own properties.
| Badge | Meaning | |
|---|---|---|
| 🩺 | Diabetic-Friendly | Lower carb, lower glycemic impact — suitable for blood sugar management. |
| 🩸 | Low Glycemic | Slower digesting carbs that avoid blood sugar spikes. |
| ♥ | Heart-Healthy | Low saturated fat, high in beneficial nutrients for cardiovascular health. |
⚠ Warning badges
Warning badges only appear when you have a relevant health condition set in your Profile. They flag meals that might not suit your specific needs.
| Badge | Appears when… | |
|---|---|---|
| ⚠️ | High Carb Warning | You have diabetes set in Profile and the meal has over 45g net carbs. |
| 🧂 | High Sodium Warning | You have hypertension set in Profile and the meal has over 800mg sodium. |
| ⚠️ | Blood Sugar Warning | You have low blood sugar set and the meal is high carb without a low-glycemic flag. |
Set your health conditions in Profile → Health Conditions to activate personalised warnings.
🥗 Diet icons
These appear on meal cards to show which diet categories a meal falls into. Hover any icon for a tooltip label.
Shopping List
The shopping list is auto-generated from your planned week. Every ingredient from every meal is pulled together, deduped, grouped into four tinted category cards, and (on Pro) scaled to your household size.

🛒 Opening the list
Click Shoppingin the header. The list builds automatically from whatever meals you have planned for the current week. If you haven’t planned the full week yet, the list reflects only the meals you’ve added so far.
📋 Tinted category cards
Ingredients are grouped into four colour-tinted cards so you can shop the right aisle at the right time:
Proteins (red) — meats, seafood, eggs, tofu.
Produce (green) — fruit, veg, herbs.
Dairy (amber) — milk, cheese, yogurt, butter.
Pantry (slate) — oils, grains, canned goods, spices.
Each card has its own progress counter (e.g. “4 / 9”) and a Check all shortcut so you can zero out a whole category in one tap.
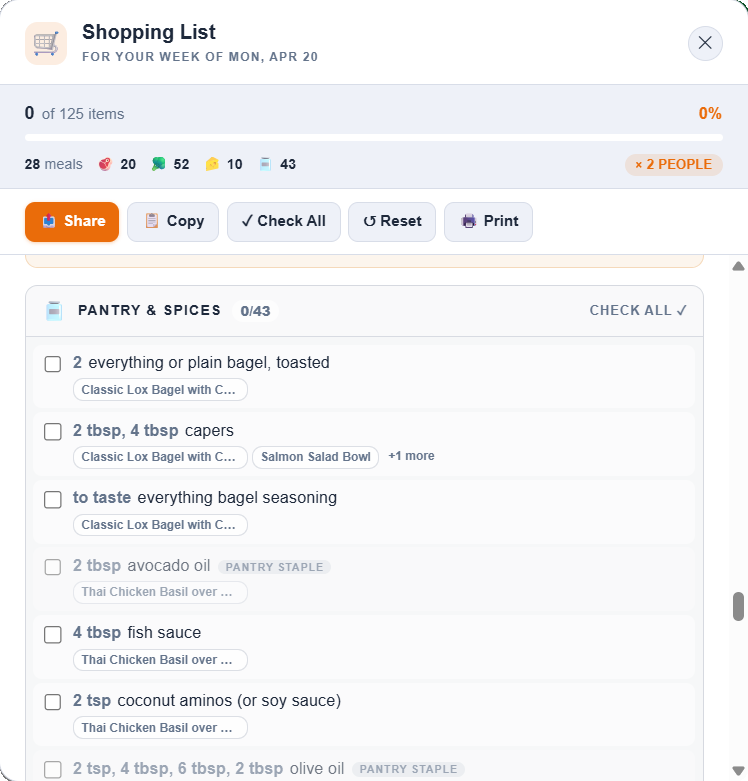
📈 Sticky progress strip & meal chips
A sticky progress strip at the top of the list shows your overall completion bar plus a meal coverage row — how many meals in the plan are fully covered by checked-off ingredients.
Under each ingredient you’ll see up to two small meal chips (e.g. “Tue Chili”, “Fri Fajitas”) so you know which meals the item belongs to — useful when you’re deciding whether to buy an ingredient for a single meal or skip it.
🌿 Pantry staples (Pro)
On Pro, common household items like salt, olive oil, black pepper, and cumin are auto-flagged as pantry staples and rendered ghosted (faded with a small “staple” tag). You can still check them off if you need to restock — but they visually drop out of the way so you can focus on what you actually need to buy this week.
📏 Household scaling (Pro)
Ingredient quantities scale automatically based on the household size you set in Profile. Set it to 4 people and all quantities multiply accordingly. Standard quantities (“2 cups”, “1/2 lb”) scale precisely; non-numeric quantities like “to taste” or “a pinch” pass through unchanged.
Update your household size in Profile before opening the shopping list to make sure quantities are right.
✓ Checking items off
Tap or click the checkbox next to any item to mark it as picked up. Checked items dim and stay in place so you can see your progress. Use Check all inside a category card to zero that category, or the reset button in the progress strip to clear everything.
📤 Copy, Print & Share (Pro)
Three buttons at the top of the list let you take the list with you:
Copy List — copies the full list to your clipboard as plain text. Paste into Notes, a message, or anywhere else.
Print — sends a clean, printer-friendly version to your printer.
📤 Share(mobile) — opens your phone’s native share sheet so you can push the list straight to Messages, Notes, Slack, or any app that accepts text.
Free users can view the full grouped list and check items off. Copy / Print / Share and household scaling are what Pro unlocks.

Profile & Preferences
Your profile tells the app about you so it can personalise Random results, shopping list quantities, health badge warnings, and nutrition targets.
📄 Opening Profile
Click the orange Profile button in the top-right of the header. Changes save automatically when you hit Save Profile.
🥗 Diet & cooking preferences
Set your preferred diet type (Keto, Paleo, Mediterranean, etc.), typical cook time, and cooking skill level. These are used by Random to pick meals that suit your lifestyle. You can also flag specific foods to avoid (e.g. pork, shellfish) and any allergies.
📧 Weekly planning reminder
A quiet email lands every Sunday morning if you haven’t finished planning the upcoming week. The subject changes based on your progress — “Your week is wide open” when you haven’t started, or “Finish the week — [N] planned so far” when you’re partway.
The email body links straight back to the planner with shortcuts to Smart Random, Copy Day, and your Favorites — enough scaffolding to finish in a couple of taps without opening anything else.
The reminder is on by default for everyone. To turn it off, scroll to Cooking Style in your Profile and toggle Weekly planning reminder off. Free for all tiers.
Sunday is the high-leverage planning day for most people — the reminder is designed to land before brunch, while you still have a couple of unbooked hours. If Sunday isn’t your planning day, turn it off and use Profile → Prep day to set your preferred timing instead.
❤ Health conditions
Set any relevant health conditions — diabetes, hypertension, or low blood sugar. When these are set, the app shows warning badges on meal cards that may not be ideal for your condition. Conditions don’t restrict what you can plan — they just give you more information.
🏋 Weight & activity goals
Enter your current weight, goal weight, height, age, sex, and activity level. The app can calculate your estimated daily energy expenditure (TDEE) and suggest a calorie target based on your weight loss or maintenance goal. Your weight progress is displayed as a visual tracker in the Profile panel.
👥 Household size
Set the number of people you’re cooking for (1–4). This controls how the shopping list scales ingredient quantities.
📅 Prep day
Set your preferred meal prep day. This is used to help structure your shopping list timing so you’re buying fresh ingredients close to when you’ll use them.
Share Everywhere
Turn any recipe, a single day, or a full 7-day week into a public link with a polished social preview image. Send it through Messages, Slack, SMS, email — anywhere a link works. Recipients don’t need an account.
🔗 Creating a share link
Recipe: open any recipe modal and hit Share in the footer. A small modal opens with the public URL displayed in a read-only input, plus Copy / Open / native Share buttons.
A single day: click the three-dot kebab menu on any day header in the planner, then pick 🔗 Share this day. This opens the share-create modal where you can customise the title (120-character cap) and hit Create.
The whole week: click the 🔗 Share Week button in the week-navigation row (right next to the date range). Same share-create modal, but pre-set to “week” mode.

📸 Snapshot semantics
Day and week shares are frozen at send-time. If you swap a meal after sharing the link, the recipient still sees the original version — so no surprises. Recipe shares always reflect the current library version of the recipe.
📋 Managing your shares
Open Profile → My Shares to see every link you’ve created with its kind pill, title, created date, last-viewed date, and view count. Each row has Copy, Open, and Revoke buttons. Revoke takes two clicks (inline confirm — no pop-up).
✨ Receiving a shared plan
Open a share link someone sent you — works with or without an account. At the top of the page, signed-in viewers see a prominent orange button: ✨ Save to My Templates for day/week shares, or ✨ Save to My Meals for recipe shares.
Day and week saves land in your Templates library (load later from the Templates modal to apply to any week). Recipe saves land in your Custom Meals with a fresh id so you can edit your private copy without touching the original. Any custom recipes embedded in a shared plan get copied into your Custom Meals first so the template resolves cleanly.
Not signed in? The button becomes Sign in to save this plan → and routes you through sign-in, then back to the share page after you authenticate.
🔒 Privacy
Shares are unlisted — only reachable by someone with the link or through a social preview crawl. Recipients never see your email, account info, or any goal / profile data; only the plan itself is in the snapshot. If a link leaks, revoke it.
🖨 Printing a share
Every share page is print-friendly — the toolbar and upsell CTA hide automatically. Cmd/Ctrl+P or the action bar’s Print button both work.
Tips & Tricks
A few things that make planning faster and more effective once you know the app.
🔄 Build a rotation
Plan 2–3 solid weeks, save each as a template, then rotate between them. You get variety without planning from scratch — and your shopping list stays predictable, which makes grocery runs faster.
⚡ Use Random as a starting point
Hit Random to fill the week, then swap out 2–3 meals you don’t fancy. It’s much faster than building from an empty grid. Over time the Random results get better as you update your Profile preferences.
📊 Watch the stats bar, not individual meals
Don’t stress over hitting perfect macros in every single meal. Watch the weekly average in the stats bar instead. A heavier dinner one night balances out with a lighter breakfast the next morning — the weekly view gives you a much clearer picture.
🌍 Plan the week ahead on Sunday
Use the forward arrow to navigate to next week’s grid on Sunday evening. Plan and save. Your shopping list will be ready the next morning, and you’ll head into the week knowing exactly what you’re eating.
🌙 Dark mode
Click the moon icon in the header to switch to dark mode. Your preference is saved automatically and persists across sessions.
❓ Still stuck?
Check the FAQ page for answers to common questions, or use the ? Helpbutton inside the app for a quick feature overview. We’re continuously adding new recipes and features based on user feedback.